Setup
E-POSTBUSINESS API
Under Assisted Setup you can find a wizard that will guide you step by step through the setup process of the App and E-POST account. Otherwise you can follow this documentation.
By searching “Connector 365 Setup” you can find the setup for the E-POST API, here you set all the necessary information to ensure that the App works without problems.
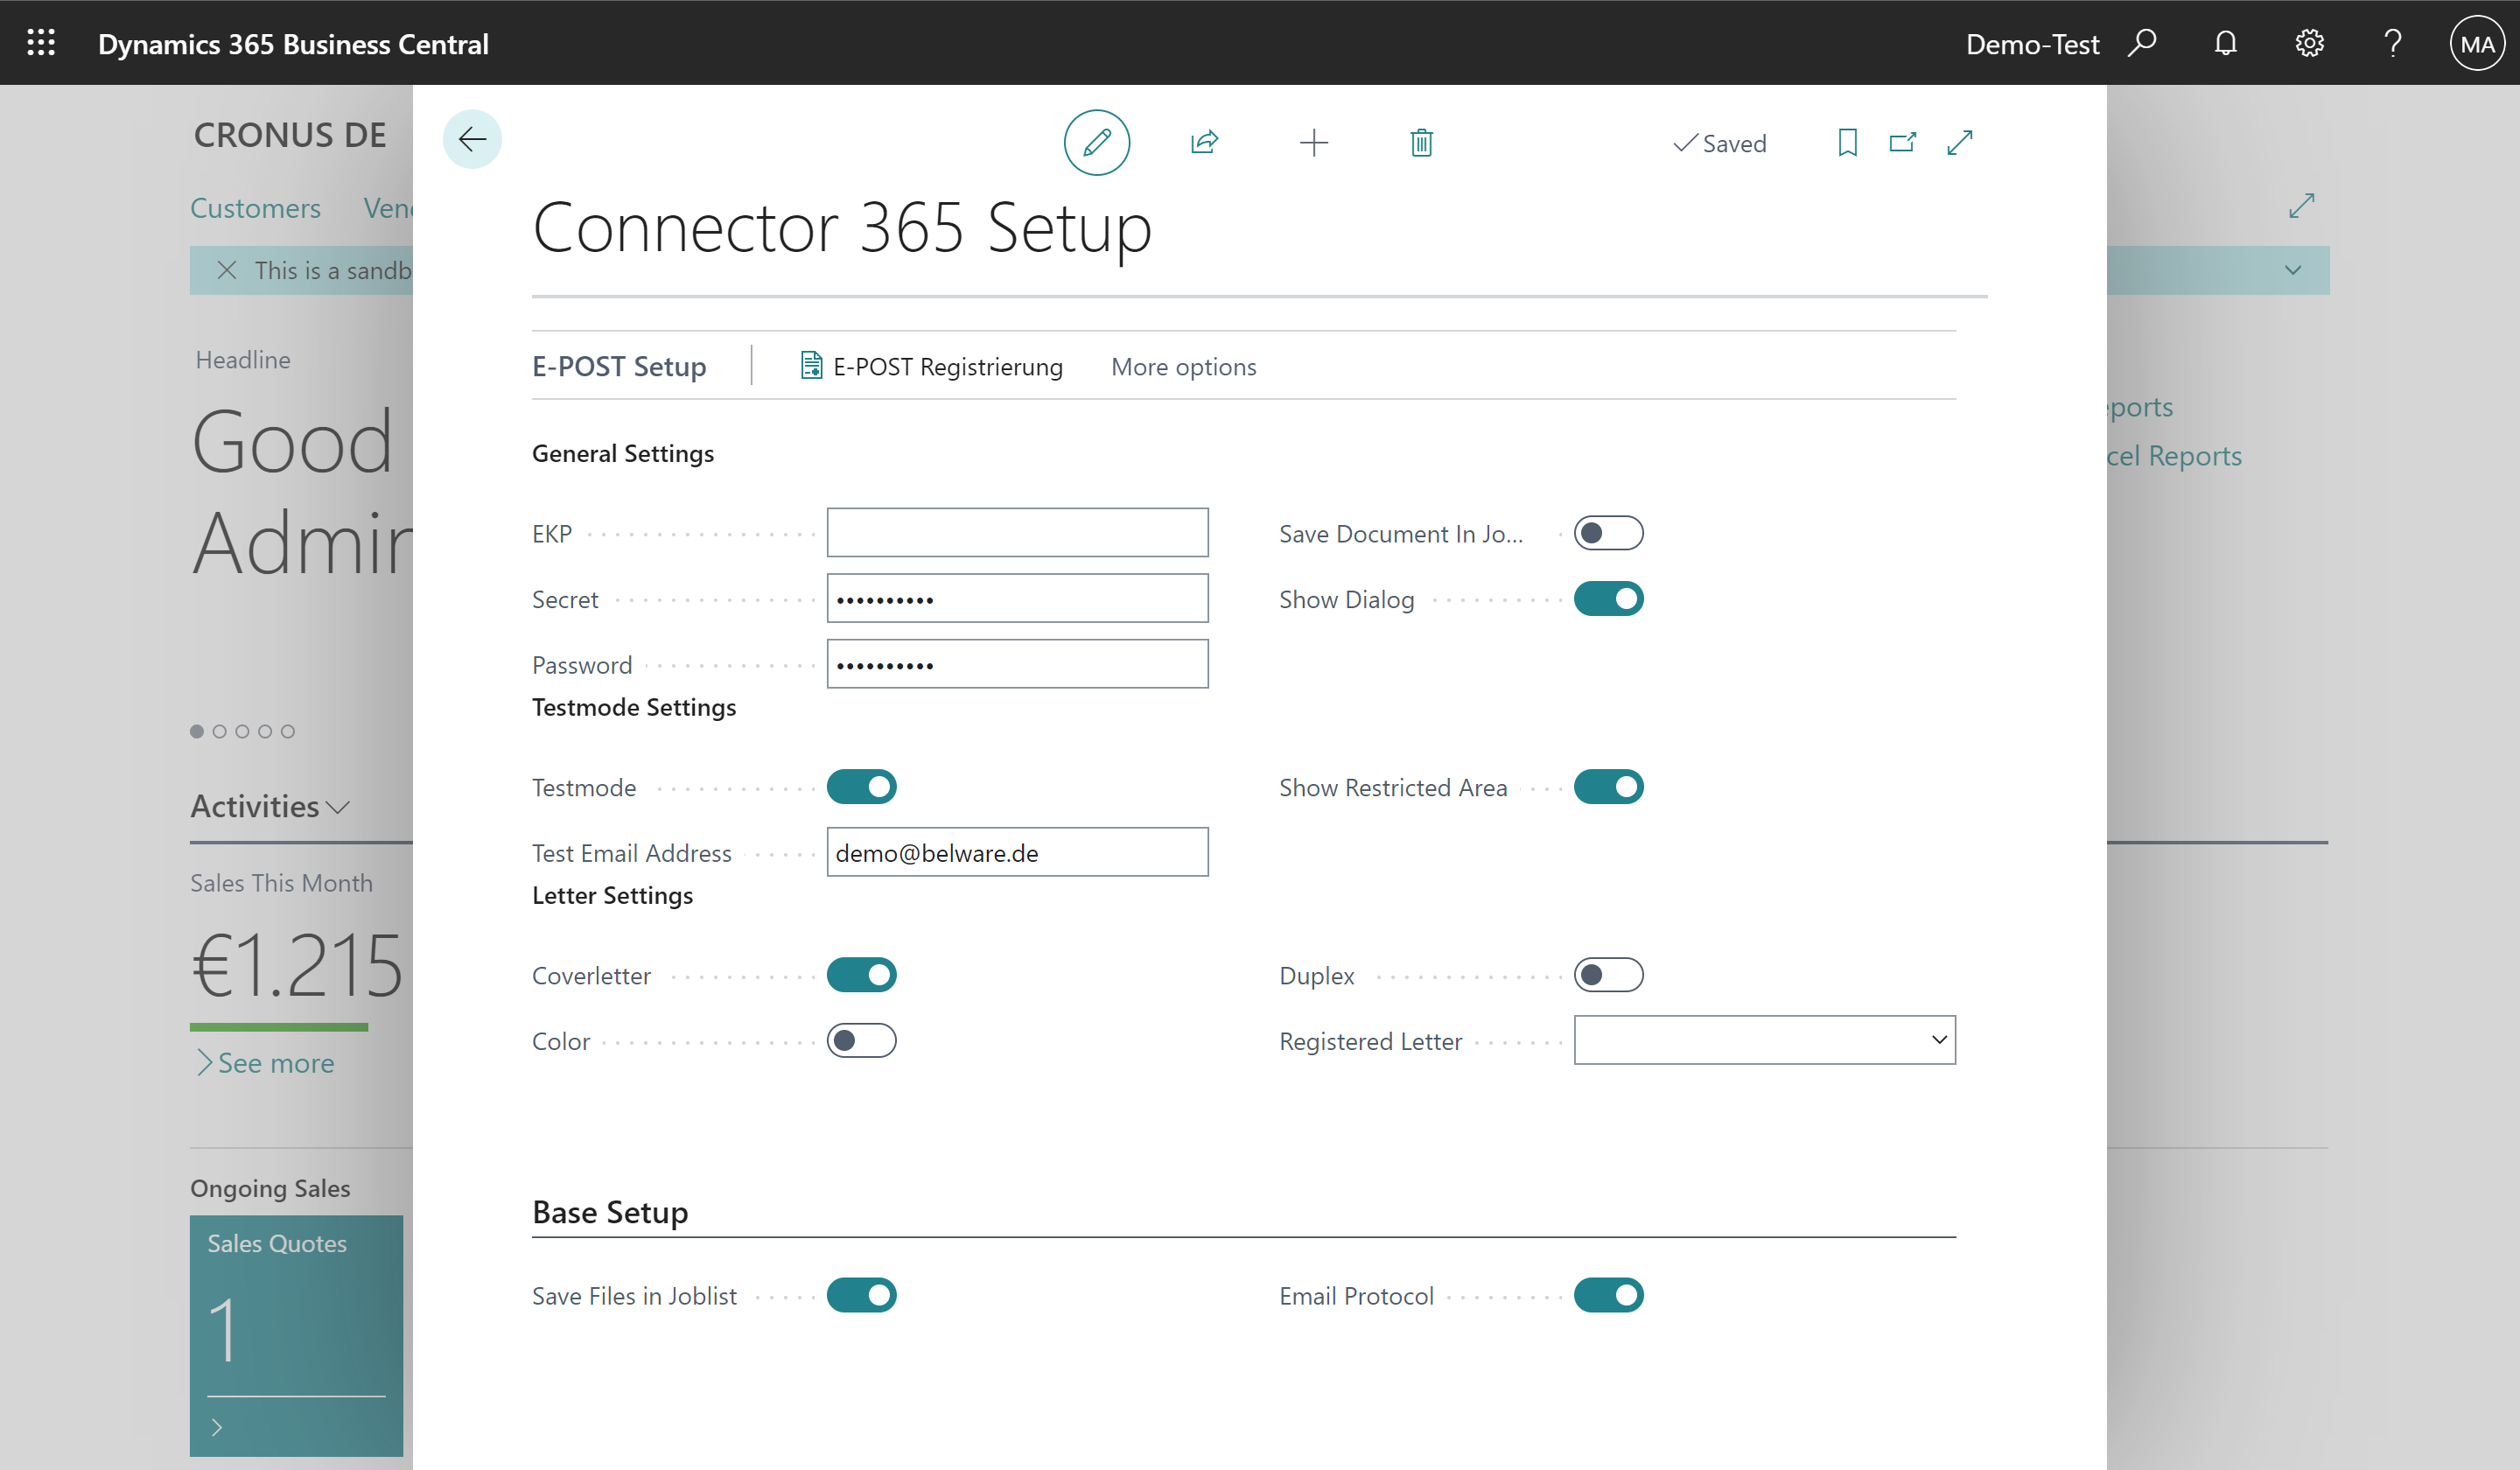
| Field | Desciption |
|---|---|
| EKP | This is your customer number that you have received from Deutsche Post |
| Secret | The secret is created automatically after you set your password |
| Password | Here is your encrypted password |
| Save File in Joblist | Determines whether sent files are archived in the job list |
| Show dialog | Determines whether another dialog for changing/checking the options is opened before sending |
| Testmode | If this option is enabled, the data of the letters will not be sent to the printing center |
| Test Email Address | If the test mode is enabled, this email address will receive a notification about the shipment |
| Show restricted area | Displays the restricted areas required by Deutsche Post on test letters |
Set a Passwort
To set a password for the App, you should first make sure that the setup is completely filled in (except for the secret/password). After that you have to click on “Set password” in the setup. A new dialog will now open and at the same time the admin that was specified during the E-POST registration will receive an SMS with a PIN.
Enter the PIN in the corresponding field and confirm the dialog with OK. The password is now set and a secret is automatically generated.
Setting up defaults
In addition to setting up the API, you can also set the defaults for sending letters here. The following options are available for this purpose:
| Field | Description |
|---|---|
| Coverletter | Sending letters with a cover sheet ensures that the letter does not exceed the areas required for printing by Deutsche Post. |
| Color | Here you choose whether the letter is printed in color or b/w |
| Duplex | Allows letters to be sent as a duplex |
| Registered Letter | Here you can set up the different ways of registered letters |
In addition to these settings for sending, you can use X to specify whether an additional dialog should be opened before sending in which the default settings for sending can be individually adjusted. If the check mark is not set, all letters are sent with the settings stored here.
*The Connector 365 E-POST App is powered by the E-POSTBUSINESS API, a service of the Deutsche Post
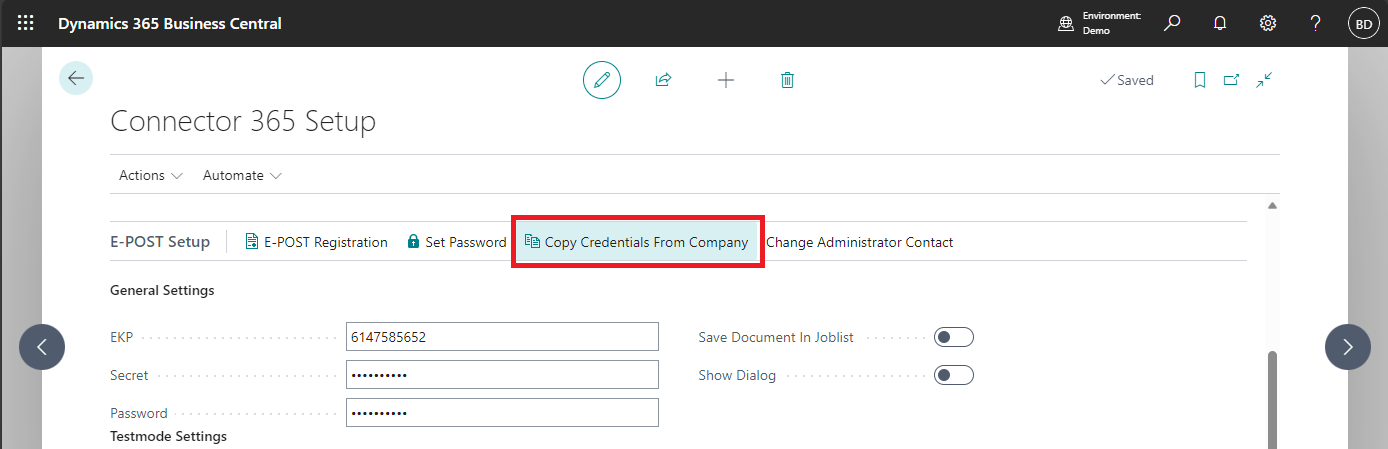
Copying Configuration Data
If you want to use an E-Post API account for multiple companies, the Connector 365 E-Post app provides a feature to copy configuration data from any company. The prerequisite is that you have successfully set up a company for using the E-Post API.
Below, you will learn how to copy E-Post configuration data from one company to another.
How to Copy E-Post Configuration Data
Once you have successfully set up a tenant for using the E-Post API, navigate to a company for which you want to copy the access data from another company.
Next, navigate to the Connector 365 Setup:
|
|---|

Then, activate the action Copy Credentials From Company:
|
|---|
A window will now open:
|
|---|
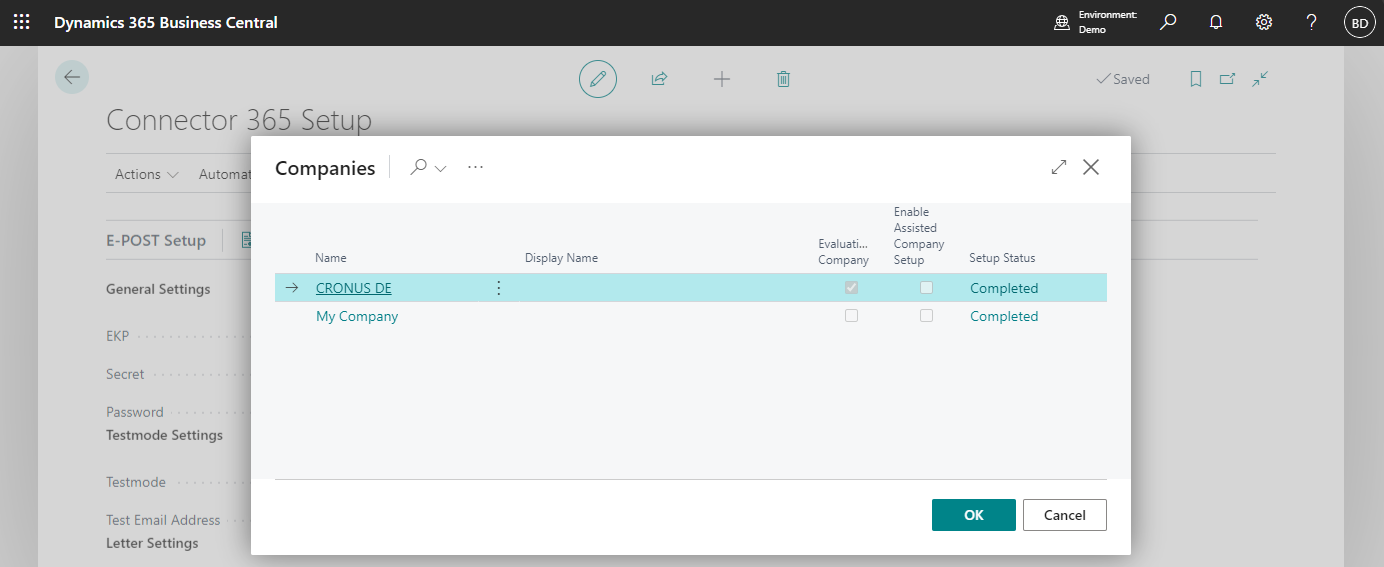
The following fields are displayed:
| Field | Meaning |
|---|---|
| Name | The name of the company |
| Display Name | The display name of the company shown on the interface |
| Evaluation Company | Specifies that the company is for trial purposes only, and that a subscription has not been purchased. |
| Enable Assisted Company Setup | Specifies that the user will be assisted in setting up the company. |
| Setup Status | Specifies the setup status of the company. |
Now, select a tenant from which you want to copy E-Post configuration data to the currently used company. Confirm your selection by clicking OK.
Changing Administrator Contact Information
For using the E-Post API, specifying an email address and a phone number of a contact person is mandatory. Both contact details can be changed if needed. Below, you will learn how to change the email address or phone number of the administrator contact.
How to Change Administrator Contact Information
First, navigate to the Connector 365 Setup:
|
|---|
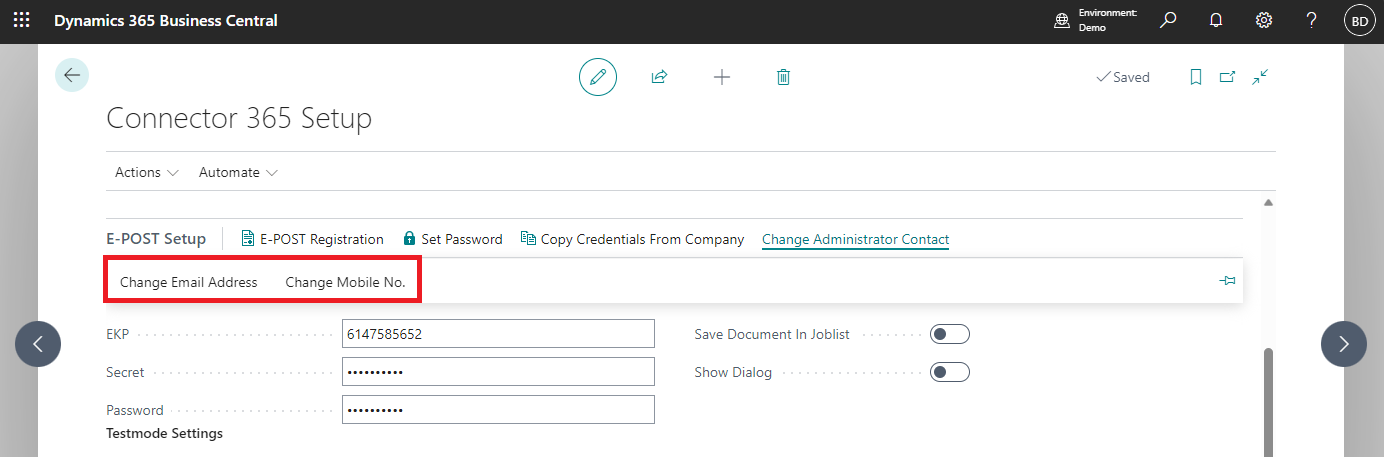
Under the E-Post Setup section, select the action Change Administrator Contact.
|
|---|
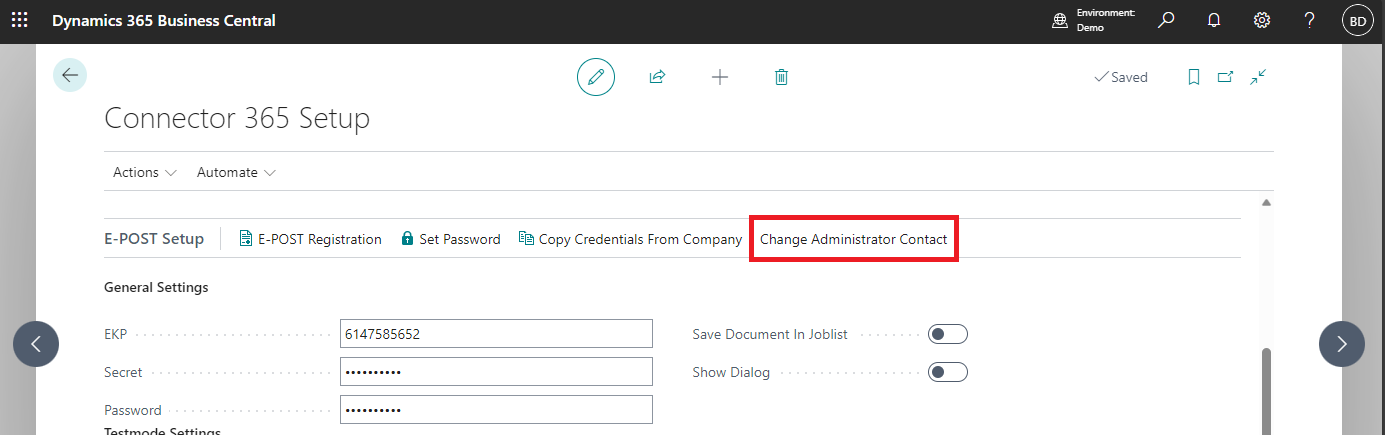
When you click this action, a submenu opens with the following options:
- Change Email Address
- Chanage Mobile No.
|
|---|
Change Email Address
If you want to change your email address, click the Change Email Address action.
|
|---|
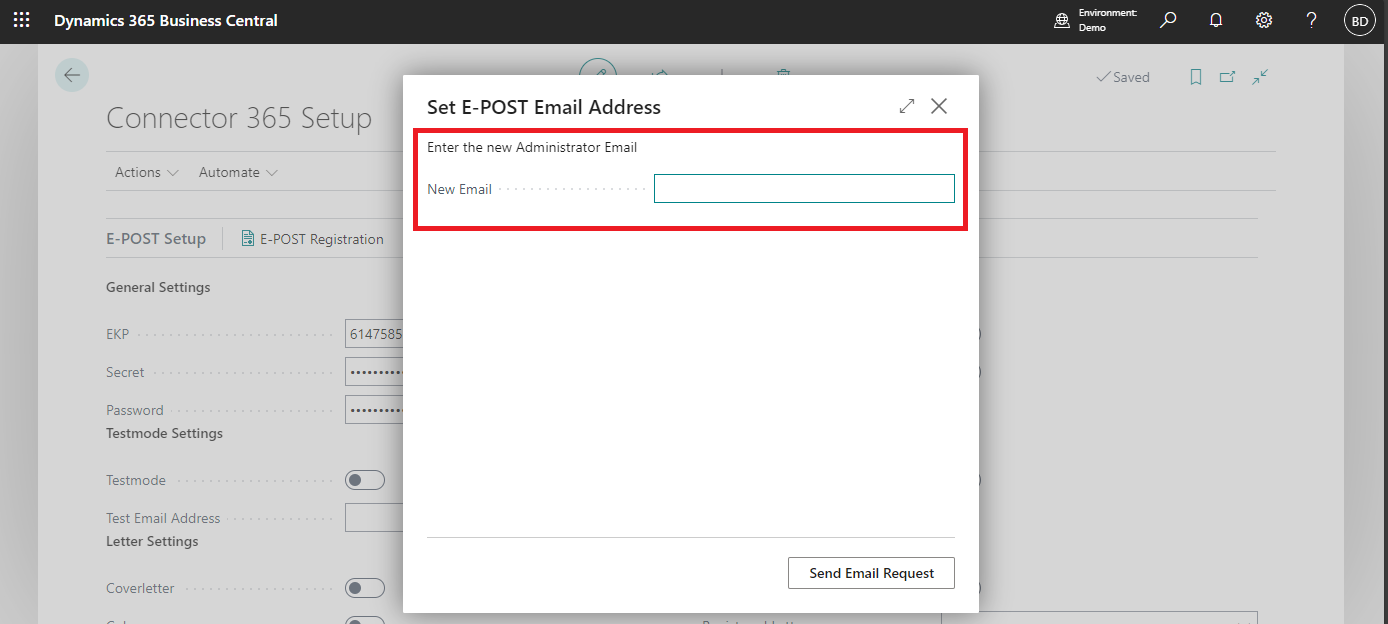
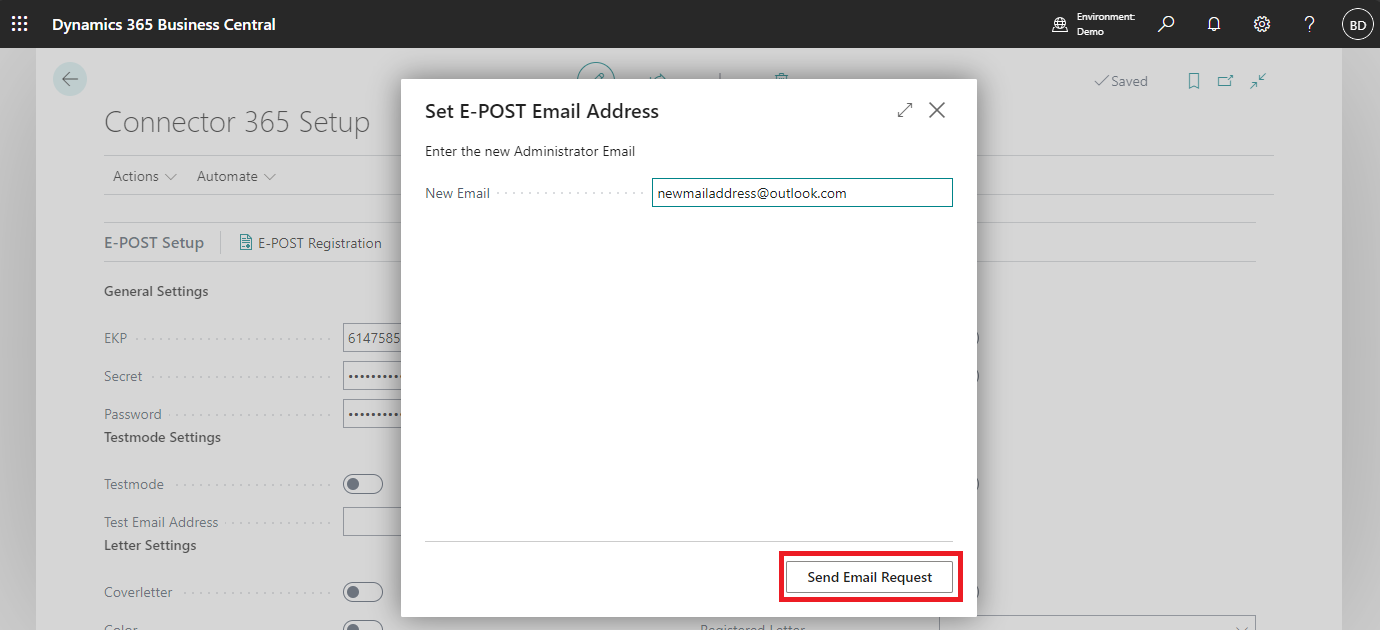
Now, enter the new email address you want to use for your E-Post API account into the New Email field. Confirm by clicking the Send Email Request action.
|
|---|
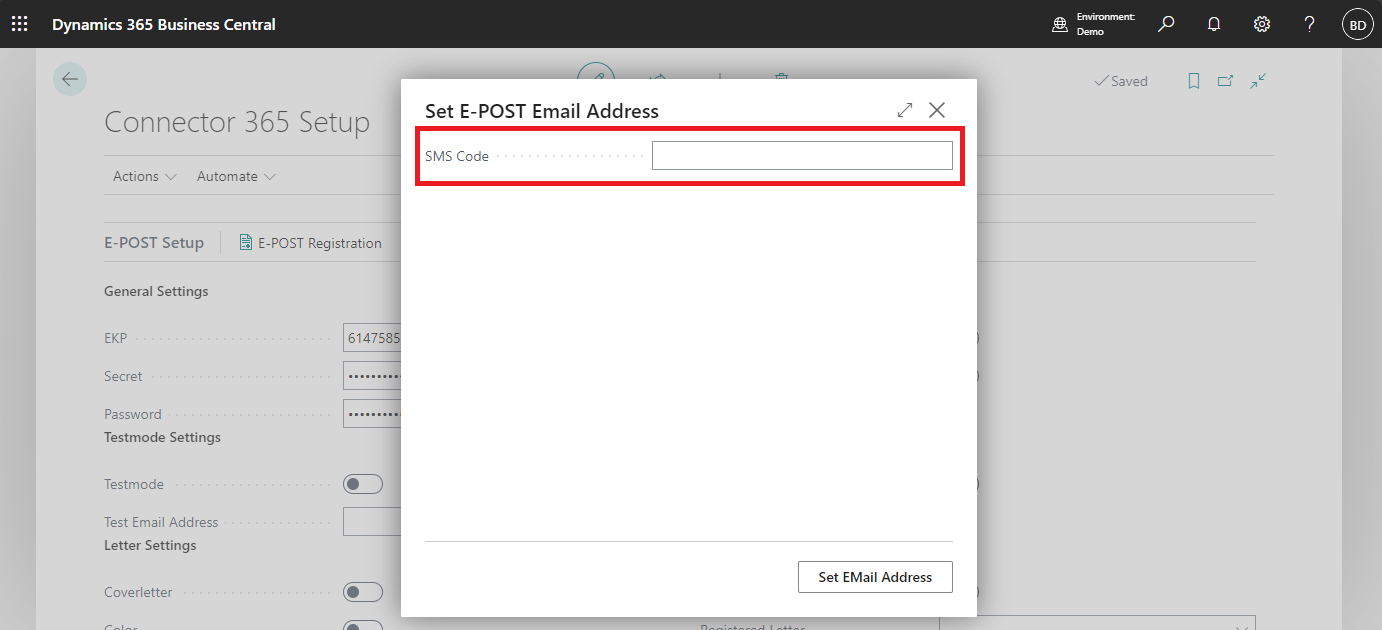
A process is now triggered in the background to send an SMS code for confirmation to the currently registered mobile number of the E-Post API account. Enter this code into the SMS Code field and confirm by clicking Set Email Address.
|
|---|
Upon successful entry, you will receive information about changing your email address.
Change Phone Number
Click the Change Phone Number action to change your registered mobile phone number.
|
|---|
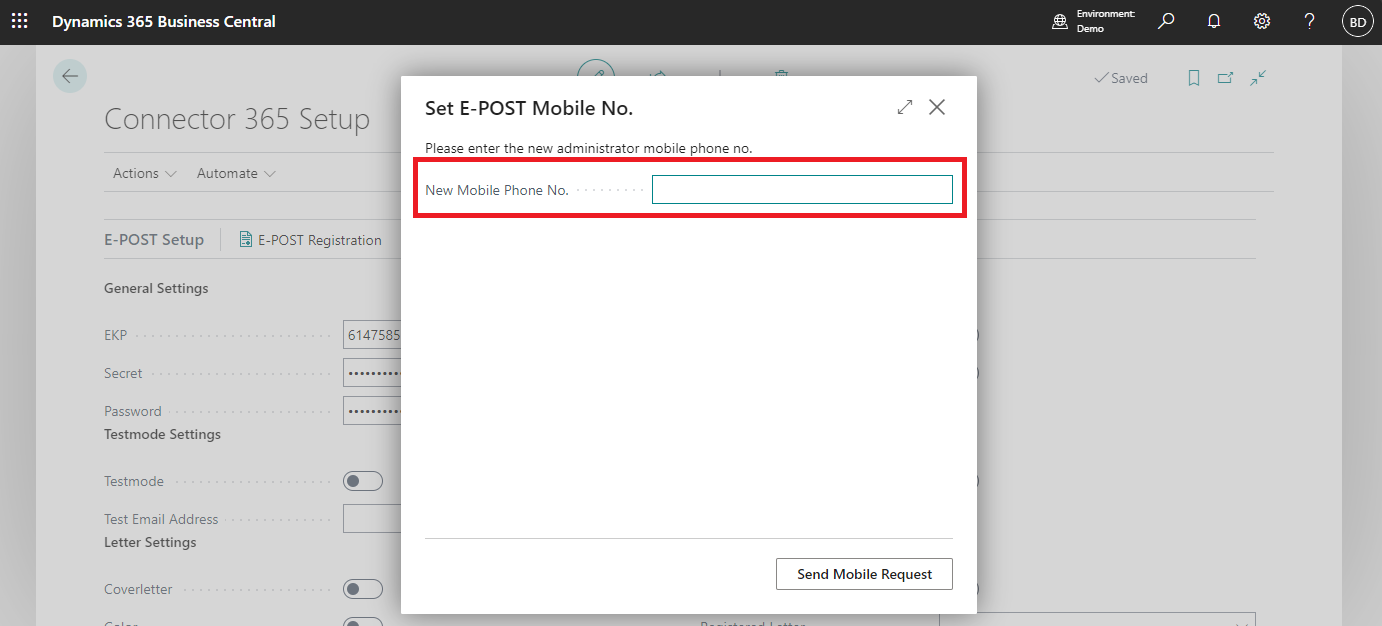
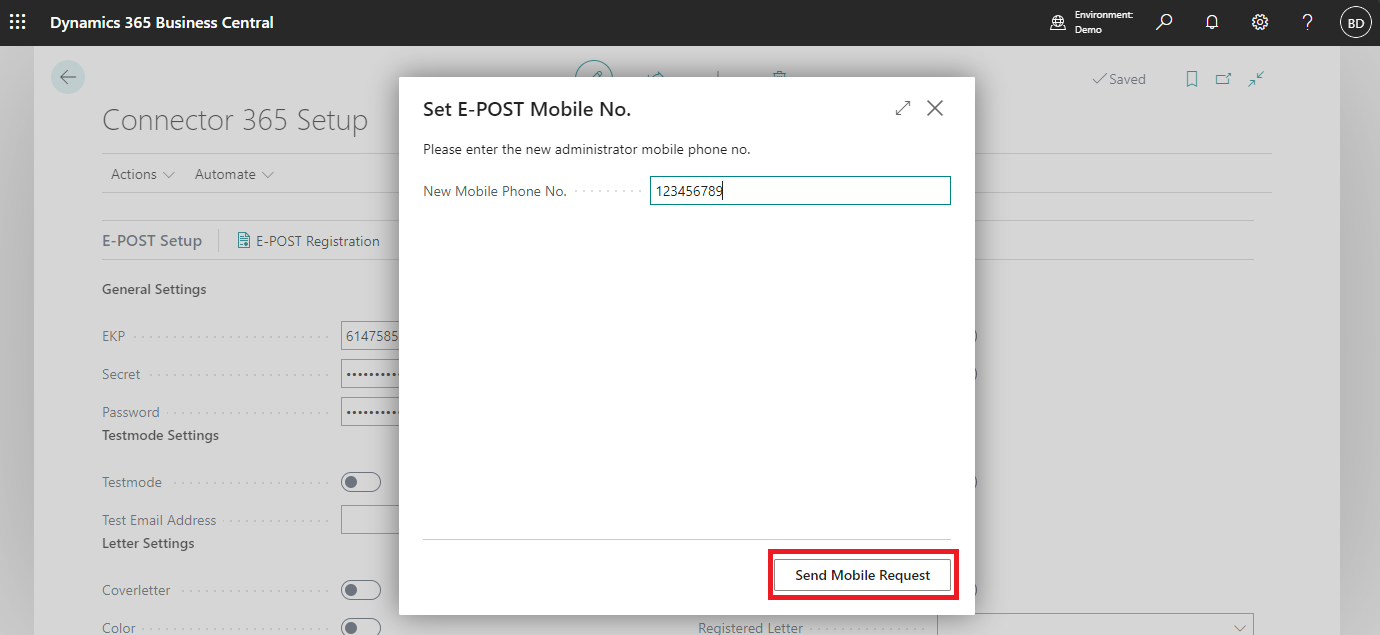
Now, enter the new phone number for your administrator contact in the New Mobile Phone No. field. Confirm your selection by clicking the Send Mobile Request action.
|
|---|
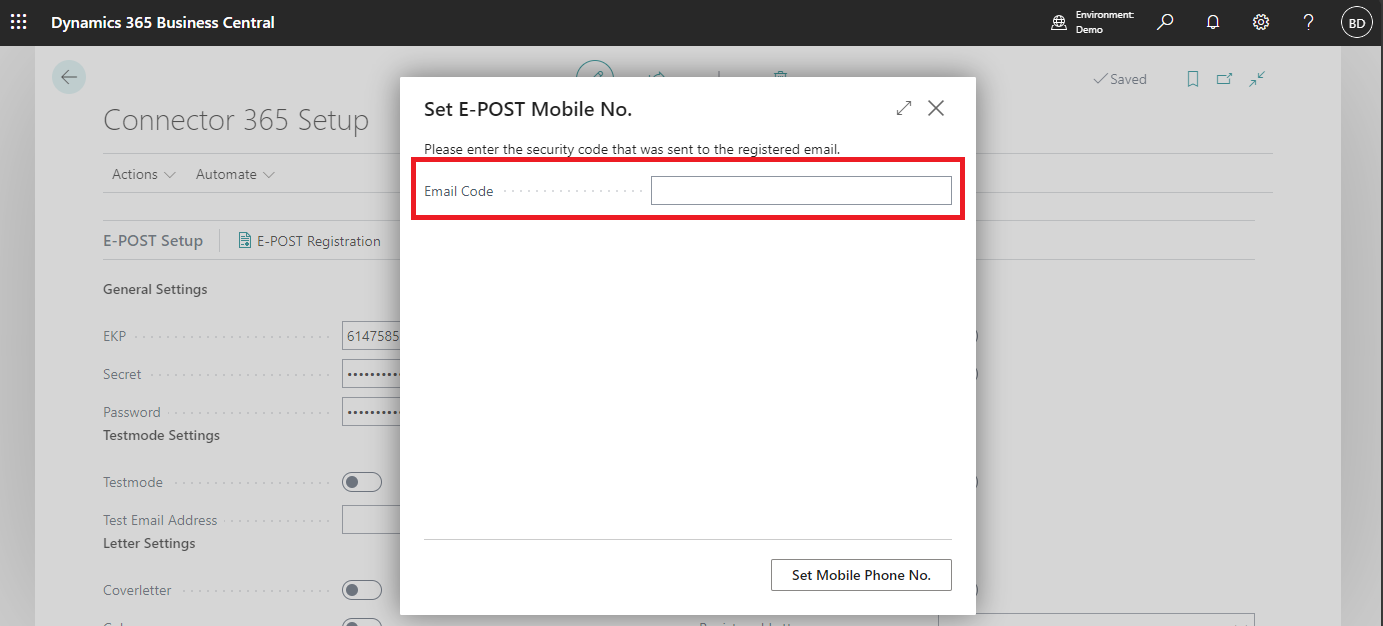
In the background, an email will be sent to the email address currently registered in the E-Post API account. This email will contain a code that you must enter into the Email Code field for confirmation. Confirm by clicking the Set Mobile Phone No. button.
|
|---|
Upon a successful request, you will receive information about the changed phone number details.
