Level 2
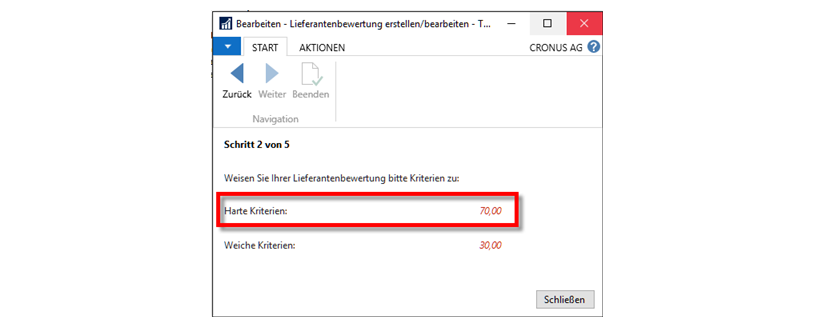
Figure 6: Setup wizard - level 2
The colored red digits correspond to the selected weighting of the respective criteria category and function as a button (cf. Figure 6). One click takes you to the
to set up the desired criteria. The following figure 7 shows an example
the setup of the “hard” factors.
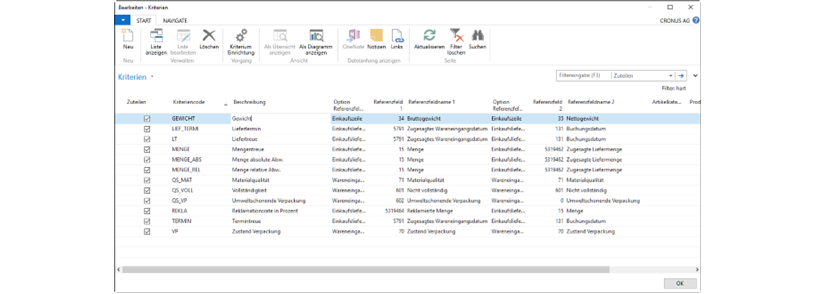
Figure 7: Criteria selection using the example of the “hard” criteria
Define all relevant criteria in this mask. For this purpose, enter a criteria code,
a description and the reference fields as a basis for evaluation. Optionally you can
additional filters for the article category, the product group, an article and a variant.
specify. This allows you a differentiated evaluation of certain products or product groups. This also allows you, for example, to weight and evaluate the complaint rate of two different product groups differently.
To set up the respective criteria, entries are made for the fields “Reference field 1”,
“Reference field 2” and the respective option on the reference field are required. On the first level
the fields are selected, which are to be compared with each other. The following example shows the possibilities available at this level.
are given on this level. For the “hard” criterion delivery reliability (cf. Figure 8), fields of the reference table purchase delivery line (posted goods receipts) are used.
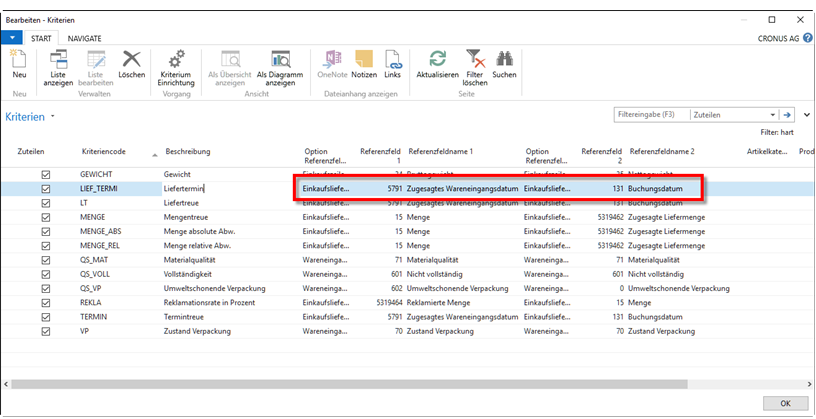
Figure 8: Setting up the hard criteria
Via the selection of the reference field all available fields of the selected reference table are displayed. In terms of the supplier’s adherence to delivery dates, the “committed goods receipt date” and the “posting date” are compared.
To view more details about the definition of the criterion, open via
button “Criterion setup” to open the detail view and define a calculation/ comparison basis.
basis for comparison. Here exemplarily on the basis of the delivery reliability:s
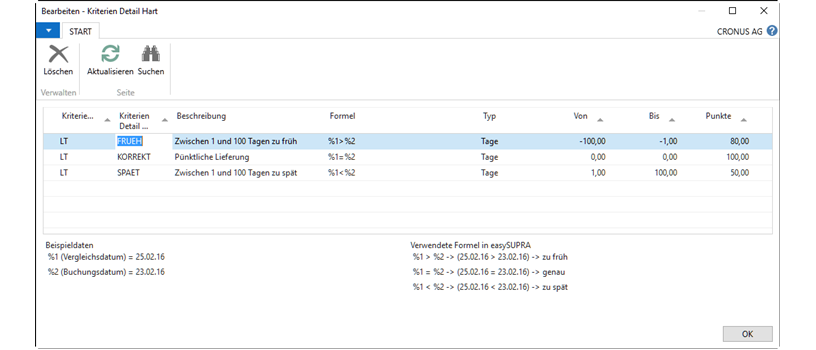
Figure 9: Detail setup of the hard criteria
The percentage signs in the “Formula” column are set in the evaluation by the selected
reference fields (see Figure 8) for the criterion. The “Reference field 1” thus corresponds to
and the “Reference field 2” %2. You can also see this assignment in the lower part of the map. In the column “Type” you define which unit is to be used for the range
(here: “Days”, also possible “Quantities” and “Percent”). The entries in the “From” and “To” columns define the validity of the criteria range. Finally, a
score must be specified for the defined range.
Please note the following when defining formulas:
- “Reference field 1” represents the ACTUAL value, whereas “Reference field 2” represents the
TARGET value, which is the basis of the comparison. - Furthermore, it should be noted that when using formulas for percentage comparisons, commas (",") must be used.
comparison, commas (",") must be replaced by periods ("."). - Please do not use pipe characters ("|") within the formulas.
For the example of delivery reliability, the “Criteria Detail Code” “FRUEH” was defined (cf.
Figure 9). Here, the fields “Committed goods receipt date” and “Posting date” from the table “Purchase delivery line” are compared. If the date of the “Committed goods receipt date” field is earlier than the date of the “Posting date” field, then the criterion of
and the delivery is evaluated with 100 points. The values are checked according to the example process (e.g. 13.03.2017 > 12.03.2017).
After you have made all the desired settings, exit the mask
by clicking on the “OK” button. To activate a completely defined criterion, activate the respective criterion via the “Allocate” check mark (cf. Figure 8) for
the current supplier rating.
Subsequently, carry out the setup for the soft criteria.
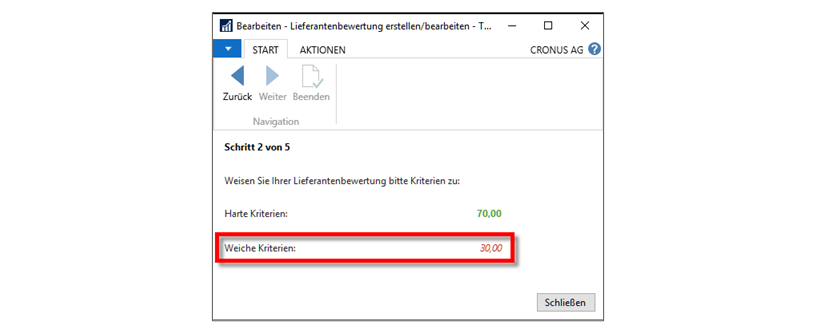
Figure 10: Setup wizard - level 2
Clicking on the weighting number of the “soft” factors will take you to the setup of them.
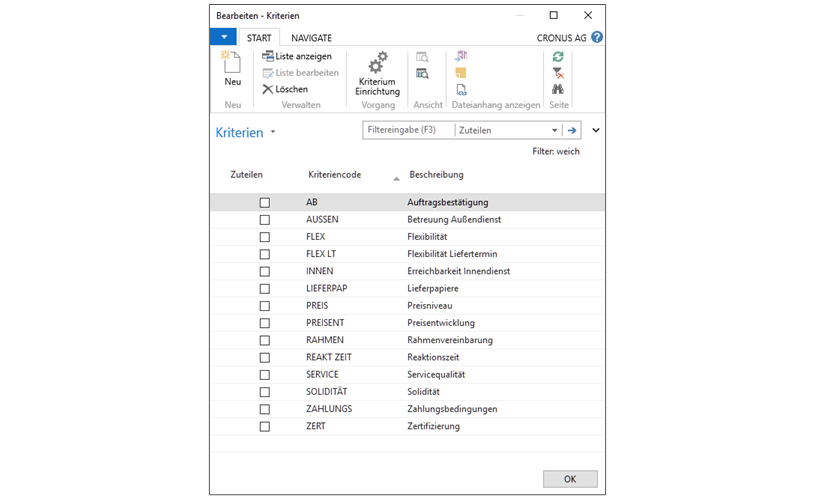
Figure 11: Definition of soft criteria
The “Criterion Setup” button (cf. Figure 11) takes you to the profile survey for the selected criterion. Here the functionalities of the Business Central
Standard contact profile survey are used (cf. Figure 12). At this point you define
your questions and the answers. You store only 1 question per criterion including the corresponding answers. So, in the current example, the question “Are order confirmations sent?” with the answers “Yes” and “No” belongs to the soft criterion “Order confirmation” (cf. Figure 12). If you would like to assign a score, this can be
under the “To value” field at the answer. When calculating the total number of points, the sum of the answer points is always divided by the number of answers given, regardless of the facility type “multiple answers possible” - Yes/No. Exit the mask by clicking on the “OK” button.
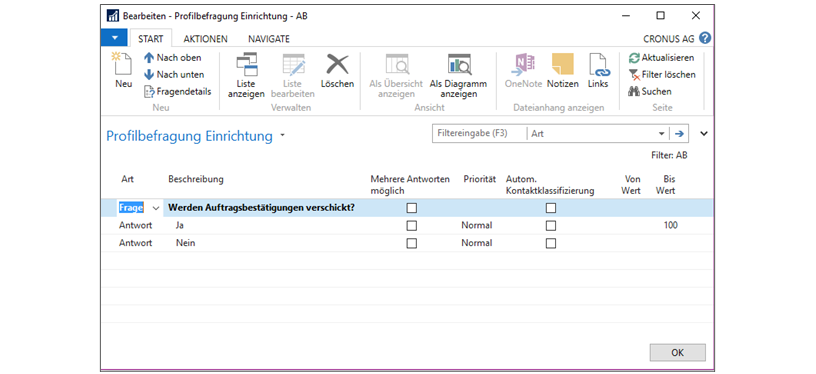
Figure 12: Setting up soft criteria via the standard profile survey
Note: You can also perform the profile survey via the creditor card. The answer is stored at the contact for the creditor. If no contact exists for the vendor yet, it will be created automatically. Please note that for this purpose, in the “Sales and
Marketing setup” a number series for contacts must be stored.
Once all the desired criteria have been defined, you will be taken back to the Level 2 setup wizard (cf. Figure 10).
Tip: All defined criteria (“hard” and “soft”) are now available for each new or existing supplier rating. The creation and setup is therefore unique and
each supplier rating can use the pool of criteria from now on.
After setting up all criteria, press the “Next” button in the wizard.
